October 6

RetroPie Get Your Game ON! Alternate instructions

retroPie

Check list:

Download uzip and load them from here: http://blog.petrockblock.com/retropie/retropie-downloads/

Both images for Pi 1 and Pi 2 will need to be uncompressed before using.

You can then burn the images on to your micro SD using either:

  • osX:  ApplePi-Baker (http://www.tweaking4all.com/hardware/raspberry-pi/macosx-apple-pi-baker/)
  • Windows: Win32 Disk Imager (http://sourceforge.net/projects/win32diskimager/)

Once complete, put your card in the slot for the Pi “opposite the usb ports.

Plug in the HDMI cable to your Monitor/TV

Plug in the microUSB cable to power up.

Get the IP Address and then use it to use putty or terminal to log into the box

ssh_logincd /home/pi/RetroPie-Setup and run ./retropie_setup.sh


Once you are logged in expand the file system so you can use up all the space on the microSD using:

  • cd /opt/retropie
  • ./raspi-config
  • select 1.expand….
  • expand_overclock
  • finish and reboot

if you get STUCK in the retropie splash screen pull the microSD card and load it into a computer. Then open the config.txt file and remove the last four lines that look like “arm_freq” “core_freq”  etc...


Install Emulators/Update

  • (OPTIONAL)  locate libmupen64plus installed (*this is for better nintendo64 emulation)
    • locate libmupen64plus (to find libmupen64plus if not see next step)
    • google it! too many steps to list here…
  • cd /home/pi/RetroPie-Setup
  • ./retropie_setup.sh
  • start install process will take 30mins PLUS
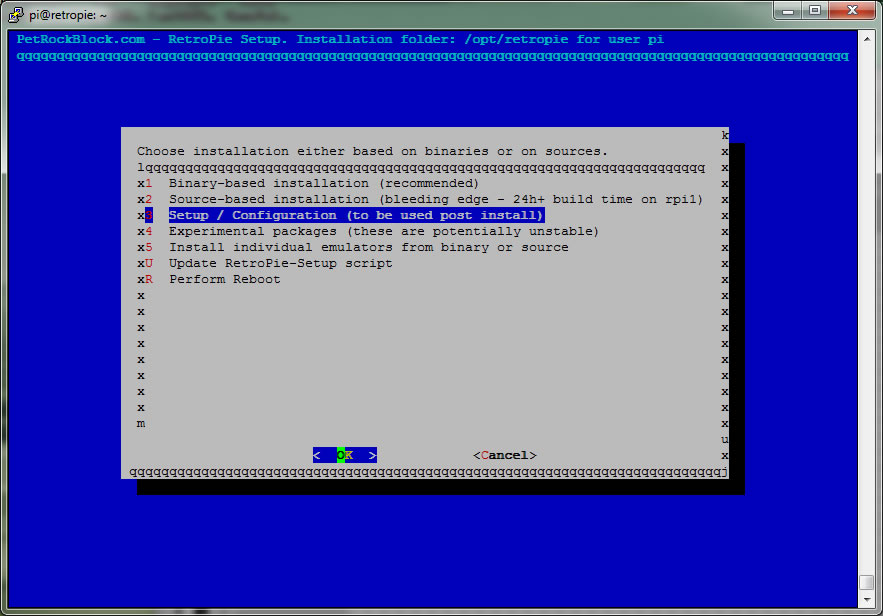
  • Reboot and then Setup configuration
  • make sure permissions (user pi) are set for roms or you won’t be able to save the game state/place.
  • EVERY time you copy a rom over you will need to perform a “RESET ownership….”


sudo vim /opt/retropie/configs/all/retroarch.cfg  (*around line 414)

*replace all existing so it looks like this

# Keyboard input, Joypad and Joyaxis will all obey the “nul” bind, which disables the bind completely,
# rather than relying on a default.
input_player1_a = a
input_player1_b = b
input_player1_y = y
input_player1_x = x
input_player1_start = enter
input_player1_select = s
input_player1_l = num1
input_player1_r = num2
input_player1_left = left
input_player1_right = right
input_player1_up = up
input_player1_down = down
input_player1_l2 = num3
input_player1_r2 = num4
input_player1_l3 = num5
input_player1_r3 = num6
# Two analog sticks (DualShock-esque).

sudo nano /opt/retropie/configs/all/retroarch.cfg  (*around end of file)

*replace all existing so it looks like this

# network_cmd_port = 55355
# stdin_cmd_enable = false
input_enable_hotkey = s

# Player 1
input_player1_joypad_index = “0”
input_player1_a_btn = “11”
input_player1_b_btn = “12”
input_player1_y_btn = “15”
input_player1_x_btn = “14”
input_player1_start_btn = “22”
input_player1_select_btn = “21”
input_player1_l_btn = “17”
input_player1_r_btn = “18”
input_player1_left_btn = “2”
input_player1_right_btn = “3”
input_player1_up_btn = “0”
input_player1_down_btn = “5”
#END PLAYER 1
input_enable_hotkey_btn = “21”
input_exit_emulator_btn = “22”

Bluetooth controllers setup:

  • sudo apt-get install bluetooth bluez-utils blueman
  • sudo apt-get install bluez python-gobject
  • sudo nano /usr/bin/bluez-simple-agent
    • change  ‘KeyboardDisplay’  to  ‘DisplayYesNo
    • reboot
  • lsub  (to see if dongle is working)
  • hcitool dev  (device name…usually hci0)
  • Connecting device NES30:  HOLD START on your NES30 controller for 3 secs
    • 1. hcitool scan
    • 2. the above should result in a unique mac id like: ” 61:04:D3:93:71:01       8Bitdo NES30 GamePad”
    • 3. sudo bluez-simple-agent hci0 61:04:D3:93:71:01   (*your macID NOT THIS ONE)
    • 4. sudo bluez-test-device trusted 61:04:D3:93:71:01 yes
    • 5. sudo bluez-test-input connect 61:04:D3:93:71:01
    • 6. if you every have issues… remove with :
    • 7. sudo bluez-test-device remove 61:04:D3:93:71:01  (*Then start from step 3)
  • cd RetroPie-Setup
  • sudo ./retropie_setup.sh
  • x3  Setup / Configu…….
  • x317  Install RetroArch joypad autoconfigs
  • x3 Setup / Config……
  • x318  Configure input devices for RetroArch
  • 1 Configure joystick/….  follow directions.
  •  sudo vim /opt/retropie/configs/all/retroarch-joypads/8BitdoNES30GamePad.cfg
  • for nes30 should look like:
  • input_device = “8Bitdo NES30 GamePad”
    input_driver = “udev”
    input_b_btn = “12”
    input_y_btn = “15”
    input_select_btn = “21”
    input_start_btn = “22”
    input_up_btn = “0”
    input_down_btn = “5”
    input_left_btn = “2”
    input_right_btn = “3”
    input_a_btn = “11”
    input_x_btn = “14”
    input_l_btn = “17”
    input_r_btn = “18”input_enable_hotkey_btn = “21”
    input_exit_emulator_btn = “22”


Install ROMs:

Roms must be in certain formats as described here:


January 30

add VPN on Centos

cd /usr/local/src
wget http://dl.fedoraproject.org/pub/epel/6/x86_64/epel-release-6-8.noarch.rpm
wget http://rpms.famillecollet.com/enterprise/remi-release-6.rpm
rpm -Uvh remi-release-6*.rpm epel-release-6*.rpm

yum install -y vpnc

make sure the ports needed are opened up otherwise this will fail.
i.e. 1723,1701,47,443,(TCP) 1701,500, 5500,4500(UDP)  if on aws you'll need to open it on server AND firewall
November 10

Moodle/Nginx install on Centos .6.6


http://mirror.hmc.edu/centos/6.6/isos/x86_64/CentOS-6.6-x86_64-minimal.iso
cat /etc/sysconfig/network-scripts/ifcfg-eth0 first make sure ethernet card is setup on boot:

to make sure you have :  ONBOOT = “yes”

sudo yum install rpm-build
yum install wget
cd /usr/local/src
wget http://dl.fedoraproject.org/pub/epel/6/x86_64/epel-release-6-8.noarch.rpm
wget http://rpms.famillecollet.com/enterprise/remi-release-6.rpm
rpm -Uvh remi-release-6*.rpm epel-release-6*.rpm
cd /etc/yum.repos.d
  add in the repo to grab latest nginx vi nginx.repo:
     #nginx.repo
     [nginx]
     name=nginx repo
     baseurl=http://nginx.org/packages/centos/6/$basearch
     gpgcheck=0
     enabled=1
  vi remi.repo
     set [remi]  enabled = 1  AND [remi-php55] enabled = 1 AND [remi-php55-debuginfo] enabled=1
yum update -y
yum install php php-fpm php-gd php-mbstring php-mcrypt php-mysql php-apc php-common php-curl php-intl php-soap php-xmlrpc  -y
yum --enablerepo=remi list mysql mysql-server
yum install git mysql mysql-server -y

vi /etc/php-fpm.d/www*

listen = /tmp/php5-fpm.sock
listen.owner = nginx
listen.group =nginx
user =nginx
group =nginx

vi /etc/php.ini

  • cgi.fix_pathinfo=1
  • add opcache:
    [opcache]
    opcache.enable=1
    opcache.memory_consumption=128
    opcache.interned_strings_buffer=8
    opcache.max_accelerated_files=4000
    opcache.revalidate_freq = 60
    opcache.max_wasted_percentage=5
    ; Required for Moodle
    opcache.use_cwd=1
    opcache.validate_timestamps=1
    opcache.save_comments = 1
    opcache.enable_file_override = 0
  • ; If something does not work in Moodle
    ;opcache.revalidate_path = 1 ; May fix problems with include paths
    ;opcache.mmap_base = 0x20000000 ; (Windows only) fix OPcache crashes with event id 487; Experimental for Moodle 2.6 and later
    ;opcache.fast_shutdown = 1
    ;opcache.enable_cli = 1 ; Speeds up CLI cron
    ;opcache.load_comments = 0 ; May lower memory use, might not be compatible with add-ons and other apps.

intall nginX:

yum install nginx

intall moodle:

  • mkdir /usr/local/src cd /usr/local/src
  • get url for moodle from https:/download.moodle.org/local/downloadmoodleorg/stats.php
  • wget http://download.moodle.org/download.php/direct/moodle/moodle-latest.zip
  • unzip moodle-latest.zip
  • mkdir /var/www/yoursite.com/
  • mv moodle/* /var/www/yoursite.com/
  • chown nginx:adm yoursite.com
  • chmod 755 yoursite.com
  • mkdir /var/www/moodledata
  • chown nginx:adm moodledata -R
  • chmod 755 moodledata -R
  • update config  with sql user/pass and moodledata path at /var/www/moodlesite/config-dist.php

nginx configuration:

rewrite ^/(.*.php)(/)(.*)$ /$1?file=/$3 last;

vi /etc/nginx/conf.d/yoursite.com.conf


### yourwebsite.com

server {
root /var/www/yourwebsite.com;
#access_log logs/yourwebsite.com-access_log;
#error_log logs/yourwebsite.com-error_log crit;

listen 80;
server_name yourwebsite.com www.yourwebsite.com;

location / {
index index.php index.html index.htm;

# moodle rewrite rules
rewrite ^/(.*.php)(/)(.*)$ /$1?file=/$3 last;
}

# php parsing
location ~ .php$ {
try_files $uri =404;
fastcgi_pass unix:/tmp/php5-fpm.sock;
fastcgi_index index.php;
fastcgi_param SCRIPT_FILENAME $document_root$fastcgi_script_name;
include fastcgi_params;
fastcgi_buffer_size 128k;
fastcgi_buffers 256 4k;
fastcgi_busy_buffers_size 256k;
fastcgi_temp_file_write_size 256k;

}

}
service mysqld restart
mysql -u root
SET PASSWORD FOR 'root'@'localhost' = PASSWORD('password');
exit;
chkconfig --levels 235 mysqld on
chkconfig --levels 235 nginx on
chkconfig --levels 235 php-fpm on
service nginx restart
service php-fpm restart

see next post for certs


October 17

Moodle instal 2.6 stable on VirtualBox

  • install centOS 6.5, download iso and install after setting up an image on VBox
  1. on virtual box open up the different ports:(*port forwarding rules)
  2. Host port 8888 to Guest Port 80
  3. sshAccess HostPort 22 to Guest Port 22
  • install php modules
    • yum install git php-common php-mysql php-gd php-intl php-curl
    • yum install php-ldap php-apc php-mbstring php-dom php-soap php-xmlrpc
    • yum install php php-mysql
    • yum install php-pear php-devel httpd-devel pcre-devel gcc make
    • pecl install apc
      • vi /etc/php.d/apc.ini
      • extension=apc.so
         apc.enabled=1
      • apc.ttl=72000
         apc.user_ttl=72000
         apc.gc_ttl=3600
      • apc.shm_size=1024M
      • apc.stat=1
      • apc.enable_cli=1
      • apc.file_update_protection=2
      • apc.max_file_size=1M
      • apc.num_files_hint=200000
      • apc.user_entries_hint=20000
  • install moodle
    • mkdir  /var/moodle
    • cd /var/moodle
    • git clone -b MOODLE_26_STABLE https://github.com/moodle/moodle.git www
    • mkdir /var/moodle/data
    • chmod 755 all
    • cd /var/moodle/www
    • cp config-dist.php config.php
    • vi config.php and make sure the below is accurate
    • $CFG->dbtype    = 'mysqli';
      $CFG->dblibrary = 'native';
      $CFG->dbhost    = 'localhost';
      $CFG->dbname    = 'moodle';
      $CFG->dbuser    = 'moodle';
      $CFG->dbpass    = 'secretpassword';
      $CFG->prefix    = 'mdl_';
      $CFG->wwwroot   = 'http://localhost';
      $CFG->dataroot  = '/var/moodle/data';
  • install apache
    • yum install httpd
    • update file permissions in moodle
    • chown -R apache:apache /var/moodle
    • chmod -R 755 /var/moodle
    • vi /etc/httpd/conf/httpd.conf
    • add the following at the end
    • <VirtualHost *:80>
          ServerAdmin webmaster@tecadmin.net
          DocumentRoot /var/moodle/www
          ServerName localhost
          CustomLog logs/moodle.tecadmin.net_log combined
      </VirtualHost>
    • in Section 2: ‘Main’ server configuration add:
    • ServerName  localhost
  • install mysql
    • rpm -Uvh https://mirror.webtatic.com/yum/el6/latest.rpm
    • make sure your clock is correct or epel will not install.
    • If meta error occurs for EPEL  switch from HTTPS to http by commenting out mirrors in /etc/yum.repos.d/epel.repo
    • yum install mysql55w mysql55w-server
    • mysql -u root -p
    • CREATE DATABASE moodle;
    • GRANT ALL ON moodle.* TO 'moodle'@'localhost' IDENTIFIED BY 'secretpassword';
    • ALTER DATABASE moodle CHARACTER SET = utf8 COLLATE = utf8_unicode_ci;
    • FLUSH PRIVILEGES;
    • quit
  • service httpd start
  • service mysqld start
  • to start on reboot:
    • chkconfig httpd on
    • chkconfig mysqld on
September 4

Chrome what happened?

Being an early adopter of Chrome and many of its benefits in speed etc… it now seems we see many of the common issues found in older browsers are no longer a stranger to chrome (*slower & bloated, profiles are corrupted weekly)…. In osX its absolutely horrid… if IE was still supported it may actually be worse?!? Safari is obviously the winner in speed for osX. Windows its a similar story especially if you’re running “too many” plugins/apps, which was one of the great things of using Chrome. Removing all the apps did make a difference but now I’m spending more time in FF and IE.. yes IE seems to have made quite a few improvements (*who would have thought??).

The newer version, of chrome 64bit, does seem better, there is still plenty of room for improvement….

http://www.ibtimes.co.uk/new-issue-within-google-chrome-web-browser-reduces-laptop-battery-life-performance-1457339

https://code.google.com/p/chromium/issues/list

September 4

Boxee box and Boxee hacks XBMC

A good friend was kind enough to give me his Boxee box, since it was just collecting dust and the remote stopped working.

Step one root it:

https://github.com/cigamit/boxeehack/wiki

Follow the instructions above, when you get to renaming the Host Name make sure you had a semicolon after boxeebox label.

Step two install xbmc:

I decided to install it on the device/internal memory rather than use the flash drive (sdcard is horrible for this).  I found this executible http://192.227.134.64/~xbmc/install_xbmc.exe  but it didn’t work for me.

instead I telneted into the box: on port 2323 with password ‘secret’… the box is running

Linux IntelCE 2.6.28 #8 PREEMPT Wed Oct 12 07:18:29   BusyBox v1.10.2

wget -O /tmp/installer.sh http://192.227.134.64/~xbmc/installer.sh && sh /tmp/installer.sh to install

Step three add flash drive anyways:

Main reason is there is only around 120Mb of space left, on the internal 1Gb of memory once your install is done…. so make sure its mounted under /media and that you update xbmc in settings to push all thumbnails etc… over to the drive. (**I had an issue with the second, most central USB port… don’t know if this is only on my Bbox but once I had the drive on the outer most USB port it worked without a hitch.)

Kinda nice to finally get a system up so quickly… the only drawback is that if you use the back button too many times any option selected seems “unselectable” you hear and see the select action happen but with out result… I then need to reboot to get the system to respond again.

Finally  if you want to add other services to run on this box think again… its running BusyBox which is extremely limited.

http://www.busybox.net/oldnews.html

  • 8 May 2008 — BusyBox 1.10.2 (stable)BusyBox 1.10.2. (gitpatcheshow to add a patch)Bugfix-only release for 1.10.x branch. It contains fixes for echo, httpd, pidof, start-stop-daemon, tar, taskset, tab completion in shells, build system.

    Please note that mdev was backported from current svn trunk. Please report if you encounter any problems with it.

using LEEF as my external flash drive… (*you can use a 16Gb without issue unless you want to save your media on the box, a raspberry pi would work better for distribution/repository).

http://www.amazon.com/Leef-Supra-PrimeGrade-Memory-Silver/dp/B00FWQMKA0/ref=sr_1_1?s=pc&ie=UTF8&qid=1409842519

September 3

DCS1832 RFK5500 and wireless issues

Had an “open Zone” issue…after removing one of my motion sensors.

I thought it could have been an issue that I may have accidentally incurred, so at first I tried to isolate the problem by removing and then adding the wireless sensor in question… *8 , installer code [5555],  804 (wireless section) and then 001  then 01 which is the zone I had assigned to the front door.

This did not work and I must have made it worse because  the other doors in the same zone seemed to stop responding to open/close…I also tried removing and adding and that didn’t work at all…..

RESET: 969

Finally in frustration I decided to reset the keypad *8 , installer code [5555],  969, [5555],969….wait for the long beep.

WIRELESS MODE:898

Proceeded to add each of the sensors back in using wireless mode *8, installer code[5555], 898. Then open and close the windows doors and set the types (01=delay entry,05=motion for stay, 03=everything else/immediate)

Finally all the doors worked again….EXCEPT the front door… At this point I realized the sensor must be bad and I had wasted my time with the initial steps…..:hit wall

I removed the old sensor and added the new one using the wireless mode and everything is kosher again.